Last box

Finally finished going through what seems to be the last box of “Get around to it”. Mostly some of ma’s stuff, or more likely some of her things that I didn’t have time to shift through when I moved. I had considered having it hauled off with some old furniture that I’m getting rid of, but decided it better to go through it and trash stuff. Walking to the dumpster is both good exercise and cheaper, lol.

Glad that I decided to sort through it because of all the things I didn’t expect to find. Most valuable, photos that never made it into the family albums or that have been missplaced over the years. A handful from the ’70s, ’80s, and ’90s that probably have copies or related photos in the family albums. But also some dating back to the ’50s and ’40s, those kind where you recognize your grandparents and go “Wow, they were young back then!”. There’s even a few of what looks to be grandpa’s masonry work on their house way back when. At least one, I’m guessing dates back to the first generation in America from the look of it. These need to be moved into the albums or perhaps an annex to them.

This is also weighed out by the number of junk found in the box. I’m pretty sure that I just threw out enough refrigerator magnets and little souvenirs from like every vacation ever and countless documents from courses my mother had done over the years that were filled under, “Hmm, might be interesting” and set aside. A few recipes I had wanted to keep. Etc. Probably all the DVDs I knew I had but haven’t found. Not to mention the damn paper shredder that I’ve been looking for for the last 6 or 7 years! Less thrilled of course is when I found the Tribbles we bought back in the ’90s. But nothing is perfect.

Between the patio storage area being cleaned out and the various inside boxes, I think I’m finally caught up with cleaning out my mother’s things. It’s only been 7 years, lol.

digiKam databases

Well, this is nifty. According to the documentation, digiKam supports using MySQL/MariaDB as a backend as an alternative to local SQLite files. Plus it documents the constraints relevant for using digiKam across multiple computers with respect to databases and collections.

On the whole, I’ve found the documentation pretty good and comprehensive. Sometimes the English feels a little off once in a blue moon. But the docs are pretty solid. I guess between 17 years of active development and growing professional grade feature sets, I should have expected the docs to be worth more than five minutes.

Good on you, digiKam contributors!

Thoughts on photo management

Along with taking the day for mental health and generally trying to be sane. I’ve been thinking about the future of how my photos are managed and how that needs to evolve.

The present system is pretty much this:

  1. Photos are cached to preferred cloud storage (+2 copies).
    • One is cleared periodically ‘en mass’ after draining.
    • One is cleared periodically during ‘archiving’.
  2. Photos are archived to my file server (+3 copies).
    • Master copies under my Plex media library.
    • Periodically backed up to another local location.
    • Entire file server is backed up locally.
  3. Photos are archived unfiltered to cloud storage (+1 copy).

Now, there’s a few problems with this scheme. Aside from getting off my butt closer to quarterly or yearly than monthly to drain cached images into the master. Over the years the definition of 3 has changed a bit. Another problem has been the evolution of format: I’ve generally migrated from classic JPEG to HEIC, as I’m seeing on the order of 50% disk savings. But of course Plex doesn’t speak HEIC, and therefore viewing outside of mounting the network drive hasn’t worked in years!

I don’t think there’s a good solution to how often I process photos through this pipeline, relative to any other habitual behavior.

There’s also the fact that whether I am draining the cache or actively looking for images, such as building my ‘Remembering Corky’ or ‘Photo Frame’ albums, that doing this at OS level kind of sucks. Explorer and Finder have actually gotten pretty good at dealing with photos since circa 2000, but aren’t exactly fun. More than once I’ve wished for something like Geeqie that my previous Unix machines had. In suffering the native tools, I found that building my Photo Frame album was really damn painful in finder’s gallery view, until I decided to just copy everything to a memory card and go through a process of deleting whatever I don’t want to move.

Actually, the general work flow and process has sucked enough that I’ve considered writing a bit of software to help compensate, or transitioning my master copy into something more cloudy and photo centric. Something that can offer better navigation / movement than a file-centric manager and a little bit more database goodness than my Photos/${YEAR}/${COLLECTION}/ approach to on disk storage.

Then in putzing around Steam Deck, taking its desktop mode for a test drive made me remember an old KDE application called digiKam. It has features for basically everything but pulling free disk storage out its digital back oriface.

In the old days, I never messed around with digiKam. Partly because it and KDE, were kind of heavy weight on my laptop back when I was a KDE user. Partly because by the time digital cameras and smartphones were part of my life, I had no KDE systems and an increasingly heterogeneous computing environment.

I’m thinking that digiKam may be a good solution to the solvable problems. It certainly should be able to handle my photos archive, which is over 40G and 14,000 image and video files. Actually, when the heck did this get so large? It feels like just a lustruum ago, I could fit everything on one Blu-ray layer 😆. Actually, maybe I should run WinDirStat or Grand Perspective over that. On the flip side, digiKam will probably offer much of the goodness I remember Google+ Photos having back when I used that. For me personally, being both cross platform and open source are huge pluses. It’s also helpful that it is one of the more cross platform KDE applications, as KDE off Linux/*BSD has become a thing.

As far as I can tell, there’s two problems to this plan.

Problem one is the file wrangling. My photos will remain on my file server with its redundant 8 TB of storage, and the SQLite databases of digiKam are best kept locally. This means that it will need its own backup management. A simple path is using my Mac and its Time Machine destination for that. How well sharing digiKam’s database files across different systems, I’m not sure, but in any case the trend has been for me to prefer one set of muscle-memory.

Problem two is transient image management. See, most of what I do with images fall under two categories: either my master repo, or some pipeline stage denoted above; or ‘a directory full of stuff I want to peruse’. I’m not sure that digiKam really handles that perusal factor. One of the things that I liked about running Debian and FreeBSD on my laptops, was being able to throw geeqie at that problem. Although, it might be viable to just create a staging area and export things.

In any case, it’s looking like digiKam is probably the best non-proprietary solution for the photo management hoopla that doesn’t involve me writing code to scratch itches.
A strong cup of coffee

Last year, I had ordered a French press and a nice burr hand grinder. Made a dandy cup of coffee, but I found that typically, it took too long to grind up a few cups worth of beans. So, sadly, it hasn’t seen much use lately.

Well, given my recent temptations to either buy an espresso machine or a new Keurig, I decided to try investing in an experiment. See, the problem with the hand crank is after a few minutes of dire need for coffee it’s exhausting, lol. The problem with an electric of course is defined in dollars.

In looking for a decent grinder that doesn’t cost too much to dub an experiment, and carefully avoiding several espresso machines, I came across a Shardor based grinder that was both cheap enough to at least call an expensive experiment at about $40, plus on sale for about 40% off (~$24) making it about as cheap as any coffee grinder with a motor in it. It’s even a Burr based model and small enough for an afternoon or weekend supply of coffee. While it arrived yesterday, I’ve been too busy and frankly, after dark isn’t a great time for a cup of cafinated joy.

This morning, I basically had to skip food and drink for other errands. Needless to say, I was pretty ready to try out the new grinder.  About 8 spoonfuls of beans and about 800 ml later, I have me some pretty good coffeeeeeeeeeeeeeeee.

Damn, that’s a nice cup of coffee!

Musings of an aging nerd

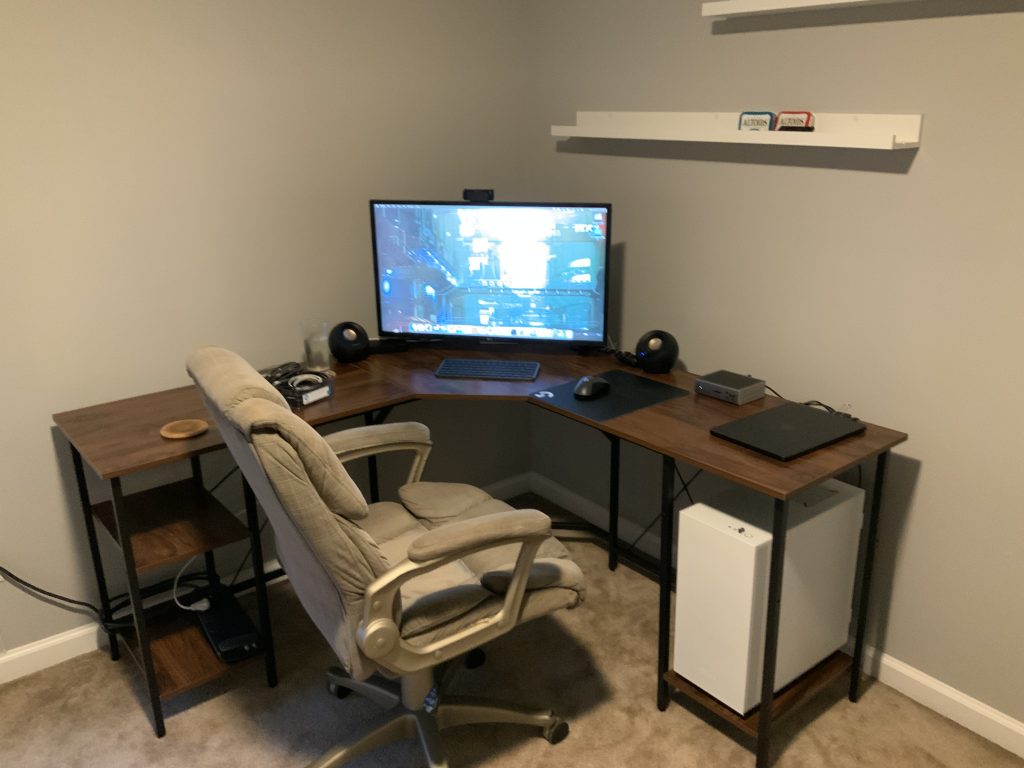
Having transitioned from “Gahh, no space!” to compact, so far the new desk is working out fairly well. If nothing else, it’s certainly nice to feel like I’ve got some desk space.

Because of the change up, I’ve been thinking of migrating Nerine’s charging point from my headboard to my desk, since it’s usually bedtime when I put my tablet on charge and that’s really the only time, I use my phone at home. My headboard’s been the charging station for ages, both due to convenience and the lack of desk space.

Actually, working off that metric and the dual desktop/laptop setup where usually my tablet is guarding my left flank anyway, I’m starting to think of my desk setup as the “Gateway station” where starships go in transient. Plus, the grey slab with technology sprouting out of it rather reminds me more of the space station in Aliens than any of the pocket-sized classes of Star Destroyer.

So far, my evil desk replacement plan has gone relatively well.

The riser that came with my new desk places the monitor too high for my tastes, and was kind of edge to edge. To compensate, I’ve replaced it with a decent monitor arm. In general: I tend to prefer my monitors lower when they’re larger / further away and high up there when they’re smaller / closer. My goal was to open room under neath for a laptop to be docked not change the monitor positioning.

On the flip side, my LG was pretty darn painless to replace its integrated stand with the arm. Using the arm also gives me better cable management and unlike the un-adjustable one my monitor came with; I could always add binder clips to it. Hehe.

Speaking of binder clips: since I had to rewire all the things, I added a pair to the back of my desk. One to the left to keep the monitor’s power brick from moving around and one to the right to retain the incoming Ethernet cable. I also fed my mouse and probably speaker data cables through it before routing accordingly.

To facilitate fast swapping between Rimuru and a laptop, I got myself a fancy USB-C hub. The USB-A hub affixed to monitor via velcro is now connected to one of its USB-A ports and my speaker is in its USB-C data port. Mouse, web camera, and Xbox adapter are in the USB-A hub on the monitor. Pretty much fetch an HDMI cable and network cable out of the closet and it’s a one cable swap to my work MBP, and a second cable for its charger. 

Because the hub’s cable can’t reach Rimuru’s 10 Gbit/s USB-C card and the 5 Gbit/s hub on the monitor was barely reaching one of Rimuru’s motherboard USB-A ports, the solution was a 10 Gbit/s USB-C extension cable running from his expansion card to the hub. That extension cable is retained by the same binder clip as the monitor’s power supply, so it won’t fall off between the narrow gap between desk and wall when swapping cables. ‘Cuz I know how that goes ;).

To facilitate this “All the things follow one cable” plan creates a bottle neck but considering that this bottle neck is a 10 Gbit/s, I don’t really mind. Most of my USB-A peripherals have limited power and data requirements. We’re talking about whether the 1080p web cam or the simple speakers draw more juice. Not trying to power a spinning hard drive and a desk lamp.

An added benefit of this novel approach is I’ve worked around an annoying problem.

Back when my first USB floppy drive went bork-bork, I had a spell where some of Rimuru’s USB-A ports seemed dead, then went back to working. In the months (~year) since then most of his ports behave in a way that makes me believe that most of the fuses are blown. As a consequence, peripherals have generally been moved to the USB-A hub on the monitor and it connected to one of the still good ports on the motherboard’s I/O panel.

Given that whatever the warranty status and pain in the assery of that might be, it’s probably a good thing my Real Focus on connectivity has been USB-C stuff, it’s probably a good thing that I bought that 10 Gbit/s expansion card for two more C ports. Considering the fuses are probably under the big ass heat sinkage and tiny as !@#$ to desoldier and replace, I’m going with definitely was a good plan to buy that expansion card.

Moving things to my one cable swap all the equipment plan kind of removes this problem. But to cope with it, I’m thinking of two more changes. Another hub on the back of the monitor that keeps the mouse/camera from sticking out the side, and a 5 Gbit/s expansion card to put some A ports where my motherboard’s PCI-E x1 slot is available. Since 10 Gbit/s requires an x4 slot, that’s already consumed by my USB-C expansion card.

Ahh, the joy of computers. Fuck them all.

Desk Plans

For the first time in quite a few years, I’m planning on a different desk setup at home. Actually, for the first time in about 16 years, I’m buying a new desk as part of the plan.

The small desk that I use has been slighted modified to suit my preference for keyboard on slab over its slide out keyboard tray. But otherwise, it’s about the same desk my mom bought about 20 years ago when we got a Pentium 4. Making the migration away from keyboard trays, and frankly having held up much better, is why it replaced my desk that I bought about 16 years ago when I got my own personal computer.

Here’s what I’m envisioning:

  1. A slab style desk about 40″ wide.
  2. Monitor riser to hold the big ass monitor.
  3. Laptop docked under the riser.
  4. Speakers to either side.
  5. Some means of swapping between tower and laptop.
For the desk part of this equation, I’m looking at this gaming desk. It’s close enough in dimensions to my mom’s old desk that I don’t think Corky will notice it encourching on his beloved bedside corner unless the cupholder falls off and hits him in the snoop or I spill a drink on his head. The included riser should be just enough to handle my monitor’s stand, and I could probably go with one of those arms if that doesn’t work out.
This should allow sliding my development Latitude or my work MacBook Pro under the riser, and in theory, maybe I can get away from the annoyance of the monitor leg being under my mouse pad 😂.
Having a slab of comparable dimension should maintain the benefit of having the room to the side for my laptop / phone / whatever the crap I’m working on but put it at the same height as my desk instead of being a “Lowered” shelf the size of a PC shelf. The lack of a place to stow my PC other than on the slab means that Rimuru will probably end up on a little rolly stand of his own, or that I’ll duct tape some cardboard together to make one.
The part that I haven’t quite figured out is device swapping.
On the back of my monitor there are strips of Velcro affixing a Gigabit switch and a USB hub. On the top is my webcam and behind are my speakers jacked into one of the dual USB-C 10 GBit/s ports on Rimuru’s expansion card.
Stack has a Dell docking station that solves most problems of interfacing if it fits but won’t be able to share much. Whether I replace it with a shiny XPS or a Mac someday, my next laptop is going to have USB-C ports much as this was a design requirement when I built Rimuru! Since most of my gear is either Bluetooth (keyboard, headphones) or USB-A (mouse, webcam, USB-A hub, Xbox controller adapter) it would be relatively easy to swap from desktop to laptop as desired by using a USB-C hub because the only Bluetooth device switching around is one with multiple device pairings. The sticky one is that my speakers require a USB-C for their data connection to actually work. The only solution I’ve been able to figure on so far, is one of the few hubs readily available that has both USB-A and USB-C ports. I figure that most connections of interest can be routed to such a hub, along with display/network for the laptop. Personally, I would prefer something like the 4-port USB-A hub on my monitor but as a 4-port USB-C hub, but those are still harder to find as most vendors are C-to-A style hubs and most have short cable lengths. The alternative would be having to switch my speakers between USB-C input and Bluetooth mode, which isn’t totally convenient since they would still need Rimuru to be powered on, making USB the better deal for toggling between devices.
A tricky part of this is the cable length such a hub. That effectively means that cable swaps would require running a USB-C to C extension cable from Rimuru to the hub and swapping the hub between that extension cable and whatever Stark’s successor is. And probably hoping that the new desk or riser lets me put binder clips on the back for cable retention, to keep the cable for falling off, lol.
Well, at least that is my concept for right now.

Operation New Coat

Ordinarily, I wear the same black light all year jacket that I’ve worn for so many years… I was already wearing it in photos 17 years ago. After so many years, it’s gotten a bit thinner and worn in places that I’ve worried someday it’ll fall apart. But it’s fit that sweet spot of a coat that is light enough to wear when it’s chilly outside and warm enough that when it’s insufficient: switching to thermal shirts or multiple layers is both a solution and recommended anyway, lol. Like my hat, it handles wind and rain well enough that I rarely need an umbrella. Actually, I’ve rarely used an umbrella or a dedicated raincoat for at least a decade now because my jacket is close enough for 70% of my rainy weather needs not just keeping warm. I love my jacket because it made a pretty effective wind breaker in its youth and remains an all year ’round coat.

When it gets really cold and windy during the winter it’s layer duty. Typically, I will add a heavy-duty fleece and a scarf that I’m pretty sure is a few decades older than I am. The over the head fleece is bothersome and ineffective against water, but as a second layer over my regular jacket it works damn well until the wind warrants thermal underwear.

The other day, Amazon’s prime deal of the day just happened to be Wantdo Men’s Waterproof 3 in 1 Ski Jacket Warm Winter Coat Windproof Snowboarding Jackets with Detachable Puffer Coat for about 20% off its current pricing. It aligns well enough with what I’ve been thinking of in a new coat for several years, and priced as “Yeah, let’s give it a shot” while the sale lasts.

So far, this is looking to be a success!

Material wise it seems like it should handle water slightly better than my old jacket; certainly, no worse. Especially given that by wearing it since circa high school: my normal jacket isn’t getting any thicker or more water resistant with age. The removable “Puffer” liner looks like on its own and zipped into the main jacket, should replace use cases where I either switch to heavy-duty fleece or wear it over my old jacket. The change from a mesh lining to warm and cozy might make it less all-year wear than my old coat, but we’ll see.

Kind of happy to see that the zippers are far from the weakest point. My old jacket, shall we say fits in that gap between decent zippers either last almost forever or make you wonder about the value of replacing them. Not sure if the various draw string pieces will hold up any better than my old jacket, but I can live with that.

A sweet boon is that the cuffs are fitted with Velcro tabs that can be used to batten down the cuffs. I’ve been stuck for years having to make do with gloves and mittens as the only pseudo-work-around when it gets windy as **** out. That the hood zips to the back of the neck and Veclros under the collar bands is nice. Typically, I’ll prefer my Boonie hat to wearing my old jacket’s hood because of superior range of head movement. Except when it is brutally cold in which case I’m putting the hood up, hat on, and wrapping a scarf around the hood, lol. So mostly, it just serves as something to snag on or tell which end of the jacket is which, or an aide for the rare days when I forget my hat and it starts to rain.

Something that remains to be seen is whether or not the pockets will be kickass or useless. My old jacket’s pockets are good enough for storing gloves or snot rags but aren’t safe for things like my phone that don’t take kindly to bouncing off concrete nor reliable for holding things that you can’t have fallen out unnoticed. The zip shut pockets are both deeper than my old jackets, ideal for keeping the free hand warm while walking the dogs. Plus, the zipped breast pocket would be a good way to store my phone for such occasions because my BDU trousers aren’t very convenient for that.

All in all, not the worst ~$66 bucks I’ve ever spent.

Simple solutions to simple problems

When I moved, I ran two cables around the room. One to behind the headboard as a spare in case I re-arrange the room someday, and another to the corner my desk is on. My desk and bed being along the same wall with desk and headboard at opposite corners.

One of the things that has irked me all these years is how much of a tight fit this is. To pull my desktop forward to access the cables: I’ve had to yank the Ethernet. Very annoying. On the flipside when screwing with old computers, sometimes Ethernet is a better deal than Wi-Fi. Thus the cable under the headboard has been handy. Give or take that I usually end up wearing out my knees since the headboard isn’t handy, and the dog takes my spot while I’m putzing with computers.

Finally I’ve caved in any decided there shall be a gigabit switch at my desk instead of a direct connection to my gateway across the room.

Since the $20 TP-Link 8-port gigabit switches I replaced some old HPs^, I opted for one of these TP-Link Lightwaves, It’s rare that I need more than one port at my desk, and space is at a far greater premium than ports^^. Damned thing is tiny as can be. I envision its mounting place to be Velcro to the back of my monitor, but for now a simple picture hanger provides an immediate solution.

And for good measure of testing: Rimiru streaming Netflix from its 1 Gbit/s Ethernet while my PowerBook G3 runs off its 10 Mbit/s Ethernet for grabbing some floppy images for the ‘ol Duo.

^ HP makes some good switches. These worked great as long as you didn’t do a lot of multicast, but had a bigger problem. Turn off a computer and all ports would experience batshit packet loss until you turn that machine back on or unplug it from the switch. Weird.

^^Unlike at work where there’s more space and far more equipment. My home is a more wireless network centric place :P.

In the course of my life, often the solutions to problems have been “Put your back into it!”. Either because power tools are expensive, or it’s something I’ll probably use once every several years at best.

Repeat after me: “I will buy a drill.”

Then go buy a drill.

Honestly at this point, the only negative I can see is the dogs might swap from offering emotional support to running for cover. Which isn’t necessarily a bad thing depending on what you’re working on.